Were you a fan of Donald Trump’s tweets? On a boring gloomy day, did you browse through his tweets to get your share of entertainment? Do you miss him on Twitter? Well, I do! So, I was wondering if all those complex deep learning algorithms can learn and get trained to generate some tweets in Donald Trump style. Does that sound fascinating to you? If the answer is “Yes”, then you are on the right page.
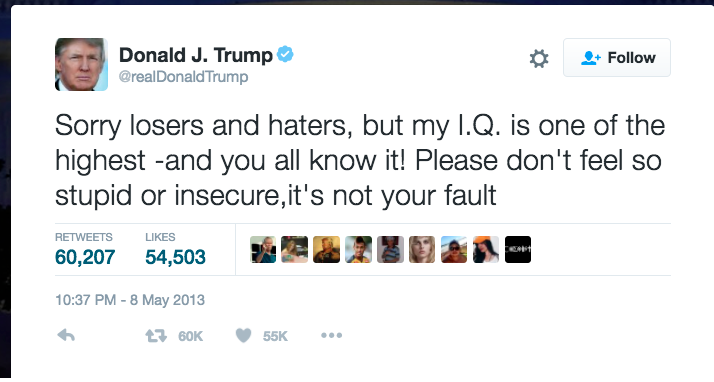
Well I have a huge list of my favorites, and it is very difficult to choose just one. But again, I can’t help but share at least one.
Do you think a Bot or a machine learning-trained application can create a tweet like that? It will be a challenging job, right? But, let’s give it a try!
Generate Tweets using LSTM
It’s fascinating how the LSTM network actually works. But, before digging into LSTM, let’s take a pause and understand what is LSTM? Well, LSTM is a special kind of RNN.
Then, what is RNN?
Recurrent Neural Networks (RNN) are a robust type of Neural Network with internal memory. In an RNN the information cycles through a loop and thus allowing the information to persists. When it makes a decision, it considers the current input and also what it has learned from the inputs it received previously.
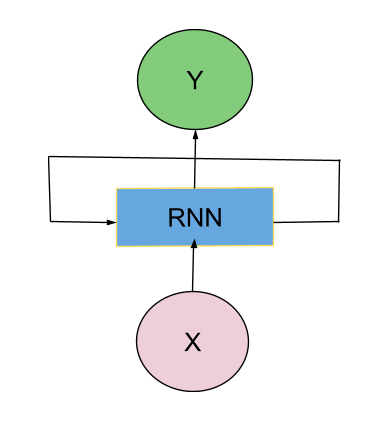
In the above diagram, the RNN takes some input (X) and outputs a value (Y). The loop allows information to be passed from one step of the network to the next. Thus RNN can connect the previous information to the present task.
But in practice, RNN is not capable of retaining the information for a long gap. For example, in a text generation model, context is sometimes important. Let’s take an example.
"I grew up in France in a very disciplined family.
 I learned baking cakes from kindergarten.
 We were not rich but never felt deprived of anything.
                         .   .   .
My taste in music was all about Alizée and Lorie.
I speak fluent ______________."
Now, for the last line, to fill up the blank, the recent information suggests that it has to be a language. But to find out what language, we need a context and a very long-term memory. Unfortunately, as that gap grows, RNNs are unable to learn to connect the information. So, what is the solution?
The answer is LSTM (Long Short Term Memory) network.
Now, LSTMs are explicitly designed to avoid the long-term dependency problem. There is a concept of cell state in LSTM and information can flow through this cell state almost unchanged and thus carrying along with the context. Does that make any sense? Well, there are some wonderful posts and books explaining LSTM networks. Those are enlightening and explains the complex concepts beautifully. But, this post is all about the practical use of LSTM.
In this post, I will read a CSV data file, will clean the data, and build a simple LSTM network for text generation. So, let’s use machine learning to generate fake tweets that match Donald Trump’s language and style!
Data
I have worked before on a couple of Text Analysis and Sentiment Analysis projects where I connected to Twitter using the API and then collected the Tweets. But today, I will work with a ready-to-use dump of tweets from Donald Trump. I have used the dataset from Kaggle.
Let’s get started!
Import Libraries
First, let’s import the required libraries.
 import numpy as np
 import pandas as pd
 import re
 import sys
 import random
 #
 from keras.models import Sequential
 from keras.layers import Dense
 from keras.layers import LSTM
 from keras.layers import Dropout
 from keras.models import Model
 from keras.layers import Input, Activation, Embedding, LSTM
 from keras.optimizers import RMSprop
 from keras.optimizers import Adam
 from keras.callbacks import LambdaCallback
 from keras.preprocessing.text import Tokenizer
 from keras.utils import to_categorical
Read Data
df = pd.read_csv("Donald-Tweets.csv")
Let’s take a look at the data set.
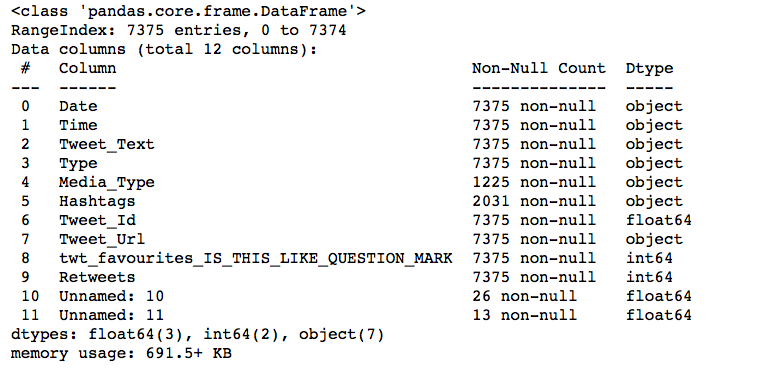
This dataset has a couple of features which may not be useful for this particular project. So, let’s concentrate on the “Tweet_Text” column.
Data Preprocessing
Now, we need to clean the data to remove the emojis and the links. We will convert the whole text into the lower case to remove duplicate words due to different cases.
## Convert to Lower case
text = df['Tweet_Text'].str.lower()

## Remove the URLs
text = text.map(lambda s: ' '.join([x for x in s.split() if 'http' not in x]))

## Remove short tweets
text = text[text.map(len)>40]

## Remove emojis
text = text.apply(lambda x: x.encode('ascii', 'ignore').decode('ascii'))
Tokenize the Text
Now, we will check the total vocabulary and will create an index for each word. The data cleaning in the above step gives a decent count for unique vocabulary.
 tokenizer = Tokenizer()
 tokenizer.fit_on_texts(text)
 vocab_size = len(tokenizer.word_counts) + 1
 print("Total Vocabulary: ", vocab_size )
Prepare Input Data
After the data is cleaned and tokenized, it is time to prepare the data so that it can be fed into the LSTM network.
Divide the data into Training and Validation Set
Let’s use 80% of the records for training and the remaining 20% of the data for validation.
 N = text.shape[0]
 print("Total Row Count: ", N)
 prop_train = 0.8
 train = int(N*prop_train)
 print("Training Data Count: ", train)
 test = N - train
 print("Test Data Coount: ", test)
Transforms each text to a sequence of integers
As of now, each row is a tweet – a sentence with some words. We will convert those text into integers by using texts_to_sequences.
 sequences, index_train, index_test = [], [], []
 count = 0
 for irow,line in enumerate(text):
     #print(irow, line)
     encoded = tokenizer.texts_to_sequences([line])[0]
     #print(encoded)
     for i in range(1, len(encoded)):
         sequence = encoded[:i+1]
         sequences.append(sequence)
        if irow < train:
          index_train.append(count)
        else:
           index_test.append(count)
        count += 1
 print('Total Sequences: %d' % (len(sequences)))
Padding to make each sequence of same length
The sequence lengths are different in the data. That’s why, we will add “0” to make each sequence of same length.
 from keras.preprocessing.sequence import pad_sequences
 max_length = max([len(seq) for seq in sequences])
 sequences = pad_sequences(sequences, maxlen=max_length, padding='pre')
 print('Max Sequence Length: %d' % max_length)
Split Data into input and output elements
 sequences = np.array(sequences)
 X, y = sequences[:,:-1],sequences[:,-1]
 print(y.shape)
 y = to_categorical(y, num_classes=vocab_size)
 X_train, y_train, X_test, y_test
= X[index_train], y[index_train],X[index_test],  y[index_test]
 print(X_train.shape)
 print(y_train.shape)
Build a Model
Ah, the final step! Since I am working on Mac Sierra on my Jupyter Notebook and I want to test and see an output, I am keeping my Model simple. The accuracy was getting better at each epoch. Maybe, creating a deeper model will yield better outputs! But anyway, let’s start with a simple model first.
def build_model(vocab_size,
                  input_length=1,
                  dim_dense_embedding=10,
                  hidden_unit_LSTM=5):
    main_input = Input(shape=(input_length,),dtype='int32',name='main_input')
    embedding = Embedding(vocab_size, dim_dense_embedding,
                          input_length=input_length)(main_input)
    x = LSTM(hidden_unit_LSTM)(embedding)
    main_output = Dense(vocab_size, activation='softmax')(x)
    model = Model(inputs=[main_input],
                   outputs=[main_output])
    return(model)
I created a function in the above to build the model and now it’s time to fit the model.
model = build_model(vocab_size,
input_length=X.shape[1],
dim_dense_embedding=30,
hidden_unit_LSTM=64)
##compile network
model.compile(loss='categorical_crossentropy',
optimizer='adam', metrics=['accuracy'])
##fit network
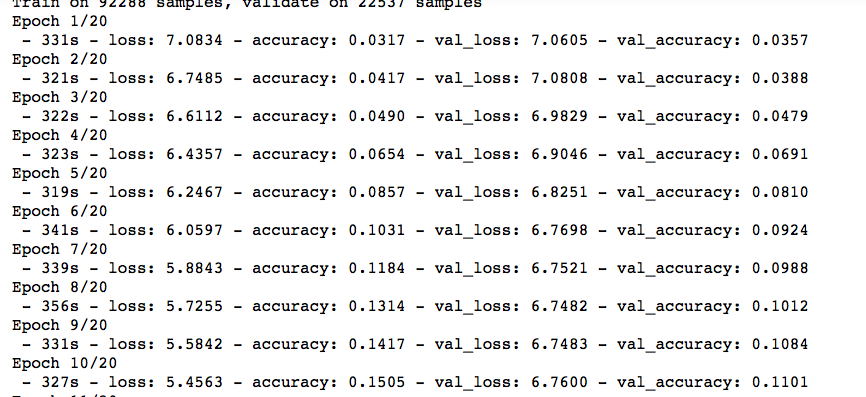
tf_model = model.fit(X_train, y_train,
validation_data = (X_test,y_test),
epochs=20, verbose=2,
batch_size=128)
The above Model runs to train on 92288 samples and validate on 22537 samples. It took around 5-6 minutes to build the network.
Test The Model
Finally, let’s take an example and see how the simple LSTM network did.
in_text = "America"
 for _ in range(100):
     # encode the text as integer
     enc = tokenizer.texts_to_sequences([in_text])[0]
     #print(enc)
     # pre-pad sequences to a fixed length
     enc_padding = pad_sequences([enc], maxlen=max_length-1, padding='pre')
     #print(enc_padding)
     probs = model.predict(enc_padding, verbose=0).flatten())
     #print(probs)
     index = np.random.choice(range(len(probs)),p=probs
     #print(index)
     index_word = {v: k for k,v in tokenizer.word_index.items()}
     word = index_word[index]
     in_text += ' ' + word
     print(in_text)
So, I pass the text “America” and the below text was generated. Does that sound like Trump?
America was made on the rails yesterday to be tough tonight in math realdonaldtrump while time trump is trumptrain we must make up so horrible talk about them the country paulteutulsr cost of they get this lead for the boy is a success door and anncoulter needed hillary nice words by the s 4 made to vote all in order to make america great again live to have seen your volunteers thanks will make our win country i called it ohio again are unless we unearthed it again got experts up and end but i am far at congress that the
As I had mentioned earlier, I like to run my notebooks on Google Colab for a fast and free experience. So, I ran the same Model on Colab and the Model got trained in a few minutes. Here’s another output where I passed the Text “Donald” and the below text was generated.
Donald trump campaign you hear you will be the next president trump2016 vote trump 14 crowd tonight told a ad did why i would watch so know alongside of the clintons mess no answering spinnnn nice and energy else worse 4 3 3 6pm golf million market fallontonight then no irrelevantglad is at beginning 8 years debate trump2016 mike neurotic made up what it everybodyrockw mines caucus know mogul amp atlantic wade watch 2016 lowlife tearing country set latinos to barrack lead to build our guns the people support if amp the next american debate i need them low chance thats
On google colab I ran for 50 epochs. But unfortunately, the output is no where near Donald’s Trump tweets. I guess, I need to make the LSTM network more dense. Here is the output:
Donald trump a wednesday iowa see you to see you soon a wonderful evening in massachusetts makeamericagreatagain trump2016 supersaturday rally what was so much for the big and spirited crowd realdonaldtrump trump2016 unifying the fact that is not borders lying her husband they decide better trade deals online 2vote trump in our end number of two poll results pundits in paper pundits about their place seat in history resulted arriving dept story comes now shoulder to talk including 1million debate laugh weu amazing event phyllis great terrific date u s s speech arriving 16 congress stands for new anger and role
It can’t be that easy to generate tweets following someone’s style. Or maybe we need to build a really complex network and try again. Until then, all the above code and the dataset are available on my Github repository.
Thank You for reading!
2