I worked for some time on different machine learning projects and writing blogs. But now, what I really wanted is to learn how to deploy a machine learning model. Well, what I really really wanted is to build an app for people to use. It’s all about making your work available to end-users, right? So yes, this post is all about deploying my first machine learning model. I am super excited about the results!
***Build a Twitter Sentiment Analysis App***
We will create a web page that will contain a search box like below and a “Go” button. A user will search for a hashtag and press GO.
For any searched query, we will scrape tweets related to that keyword in real-time and for all those scraped tweets we will use the hate-love detection model to classify those results.
Tools and Skills to Deploy a ML Model
To achieve this functionality, we need the below tools and knowledge:
- Basic HTML
- Python
- Flask
We need some basic HTML skills to build a simple front end application. I have worked on my Jupyter Notebook and built the Model using Python. And Flask gives a variety of choices i.e. the necessary tools and libraries for developing a web application.
So, let’s get started!
As I said before, this is the first step towards building a web application. It will require a lot of tuning and decking up to make it presentable. But believe me, it’s a good start.
Let’s divide the whole project in step-by-step modules.
1. Create the Front End of the application using HTML
Honestly, you do not have to be a pro in HTML to build the front end of your application. Well, I am not. What I did was, I started with a basic page and then I keep on adding some descriptive text, an input text, and a Button, and finally some color. So, here is a below sample to start from:
<!DOCTYPE html>
<html>
<body>
   <div>
   <h2>A Sample Page </h2>
   </div>
</body>
</html>
</doctype>
Now, below is my HTML document as of now:
HTML Code for Twitter Sentiment Analyzing App:
<!DOCTYPE html>
<html>
<head>
<link rel="stylesheet" href="https://cdnjs.cloudflare.com/ajax/libs/font-awesome/4.7.0/css/font-awesome.min.css">
<style>
* {box-sizing: border-box;}
html, body {
width: 100%;
word-wrap: break-word;
text-align: left;
height: 100%;
margin: 0;
padding: 0;
background-color: green;
container {
width: inherit;
height: inherit;
margin: 0;
padding: 0;
background-color: pink;
body {
margin: 0;
font-family: Arial, Helvetica, sans-serif;
.topnav {
overflow: hidden;
background-color: #e9e9e9;
.topnav a {
float: left;
display: block;
color: black;
text-align: center;
padding: 14px 16px;
text-decoration: none;
font-size: 17px;
.topnav a:hover {
background-color: #ddd;
color: black;
.topnav a.active {
background-color: #2196F3;
color: white;
.topnav .search-container {
float: right ;
.topnav input[type=text] {
padding: 6px;
margin-top: 8px;
font-size: 17px;
border: none;
width: 700px;
.topnav .search-container button {
float: right;
padding: 6px 10px;
margin-top: 8px;
margin-right: 16px;
background: #ddd;
font-size: 17px;
border: none;
cursor: pointer;
width: 100px;
.topnav .search-container button:hover {
background: #ccc;
@media screen and (max-width: 600px) {
.topnav .search-container {
float: none;
.topnav a, .topnav input[type=text], .topnav .search-container button {
float: none;
display: block;
text-align: left;
width: 100%;
margin: 0;
padding: 14px;
.topnav input[type=text] {
border: 1px solid #ccc;
</style>
</head>
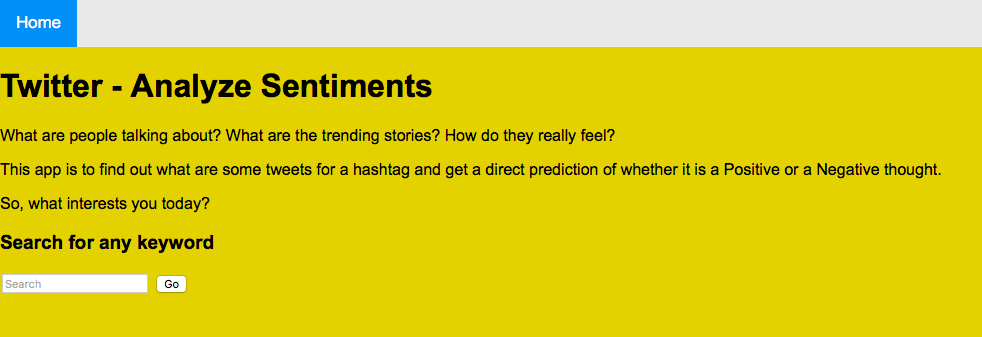
<body style="background: #E4CD05;">
<title>Twitter - Analyze Sentiments</title>
<div class="topnav">
<a class="active" href="#home">Home</a>
</div>
<h1>Twitter - Analyze Sentiments</h2>
<p> What are people talking about? What are the trending stories? How do they really feel?</p>
<p> This app is to find out what are some tweets for a hashtag and get a direct prediction of whether it is a Positive or a Negative thought.
<div>
<p>So, what interests you today?</p>
<h3>Search for any keyword</h3>
</div>
<div class="search-container">
<form action = "http://localhost:5000/" method = "post">
<input type="text" class="search-box" placeholder="Search" name="search">
<button class="search-button">Go</button>
</div>
</body>
</html>
</doctype>So, I have named the above document as “home.html” and saved it in my working directory under a folder named “templates“. Now, this is important! I spent some time figuring it out. Once saved, you can simply double-click and open it and check if it looks correct.
2. Build an ML Classification Model to detect Love or Hate from Tweets
Dataset:
We’ll work with a Twitter dataset in this section. Our aim is to detect hate or love speech in Tweets.
I searched and collected a few datasets for sentiment analysis and chose the one which is more or less balanced.
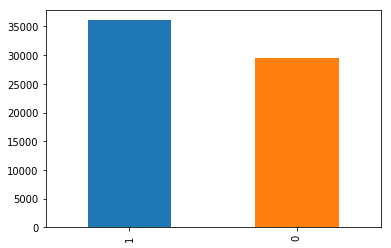
Unfortunately, I do not remember the source. But I should mention that the dataset was balanced and clean. I built a few Models with some other datasets. But the performance was not so good. The reason being most of the tweets were positive. Well, finally I got the one that exactly I was looking for.
The dataset I used finally is right here at my Github repository.
ML Model
I did not want to spend much time on tuning the model because my focus was to deploy it. Still, it has to work, right? So, let’s start with loading the data and Building our Model.
Import Libraries
importing required libraries
import pandas as pd
import matplotlib.pyplot as plt
import re
from nltk.corpus import stopwords
from sklearn.feature_extraction.text import ENGLISH_STOP_WORDS, TfidfVectorizer
from sklearn.linear_model import LogisticRegression
from sklearn.ensemble import RandomForestClassifier
from sklearn.pipeline import Pipeline
from sklearn.metrics import f1_score
from sklearn.model_selection import train_test_split
Read Data
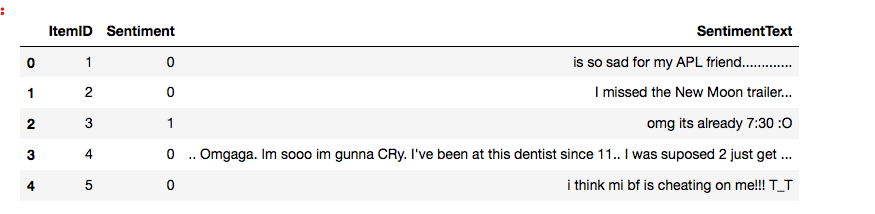
df_tweets = pd.read_csv("twitter_sentiments.csv")
df_tweets.info()
So, this dataset has a couple of other fields which are not required for this analysis.

Remove Columns
del df_tweets["SentimentSource"]
del df_tweets["Unnamed: 4"]
del df_tweets["Unnamed: 5"]
del df_tweets["Unnamed: 6"]
Okay, so below is the data we have as of now:
Data Preprocessing/Cleaning
convert to lower case
df_tweets['clean_tweet'] = df_tweets['SentimentText'].str.lower()
Remove punctuations
df_tweets['clean_tweet'] = df_tweets['clean_tweet'].str.replace('[^\w\s]',' ')
Remove spaces in between words
df_tweets['clean_tweet'] = df_tweets['clean_tweet'].str.replace(' +', ' ')
Remove Numbers
df_tweets['clean_tweet'] = df_tweets['clean_tweet'].str.replace('\d+', '')
Remove trailing spaces
df_tweets['clean_tweet'] = df_tweets['clean_tweet'].str.strip()
Remove URLS
df_tweets['clean_tweet'] = df_tweets['clean_tweet'].apply(lambda x: re.split('https:\/\/.*', str(x))[0])
remove stop words
stop = stopwords.words('english')
stop.extend(["racism","alllivesmatter","amp","https","co","like","people","black","white"])
df_tweets['clean_tweet'] = df_tweets['clean_tweet'].apply(lambda x: " ".join(x for x in x.split() if x not in stop ))
Split Dataset
train test split
df_train, df_test = train_test_split(df_tweets, test_size = 0.2, stratify = df_tweets['Sentiment'], random_state=21)
get the shape of train and test split.
print(df_train.shape, df_test.shape)
Create TF-IDF Vector
create a TF-IDF vectorizer object
tfidf_vectorizer = TfidfVectorizer(lowercase= True, max_features=1000, stop_words=ENGLISH_STOP_WORDS)
fit the object with the training data tweets
tfidf_vectorizer.fit(df_train.clean_tweet)

transform the train and test data
train_idf = tfidf_vectorizer.transform(df_train.clean_tweet)
test_idf = tfidf_vectorizer.transform(df_test.clean_tweet)
Logistic Regression Model
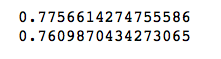
create the object of Logistic Regression Model
model_LR = LogisticRegression()
fit the model with the training data
model_LR.fit(train_idf, df_train.Sentiment)
predict the label on the traning data
predict_train = model_LR.predict(train_idf)
predict the model on the test data
predict_test = model_LR.predict(test_idf)
f1 score on train data
print(f1_score(y_true= df_train.Sentiment, y_pred= predict_train))
print(f1_score(y_true= df_test.Sentiment, y_pred= predict_test))
So, if we check the performance of the Logistic Regression Model, it is not so bad!
But I wanted to give a quick try to some other ML Model and see if the performance is better.
Random Forest Model
create the object of Random Forest Model
model_RF = RandomForestClassifier(n_estimators=100)
fit the model with the training data
model_RF.fit(train_idf, df_train.Sentiment)
predict the label on the traning data
predict_train = model_RF.predict(train_idf)
predict the model on the test data
predict_test = model_RF.predict(test_idf)
f1 score on train data
print(f1_score(y_true= df_train.Sentiment, y_pred= predict_train))
print(f1_score(y_true= df_test.Sentiment, y_pred= predict_test))
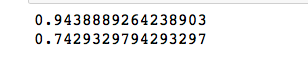
Well, it is not a great improvement for the Test dataset. Still, I will go with my Random Forest Model.
Pipeline
Let’s define the steps of the pipeline:
- Step 1: Create a TF-IDF vector of the tweet text as defined above
- Step 2: Use a random forest model to predict the target labels
pipeline = Pipeline(steps= [('tfidf', TfidfVectorizer(lowercase=True,
max_features=1000,
stop_words= ENGLISH_STOP_WORDS)),
('model', RandomForestClassifier(n_estimators = 100))])
fit the pipeline model with the training data
pipeline.fit(df_train.clean_tweet, df_train.Sentiment)
When we use the fit() function with a pipeline object, both steps are executed.
Save the Pipeline Model
import joblib
from joblib import dump
dump the pipeline model
dump(pipeline, filename="text_classification.joblib")
3. Setup Twitter API
I have worked before on several Tweets Analysis. So, in this post, I will not repeat the same details. Below are a few of them which has all the details about connecting Twitter and collecting tweets.
Collect Tweets on Corona from Twitter using Tweepy
Streaming Tweets from Twitter using Tweepy and Text Analytics
Explore Twitter Trends By Location using Python
Sentiment Analysis using TextBlob – Exploring #Racism #AllLivesMatter in Twitter
So, today I will skip directly to connect Twitter part.
Connect Twitter
import tweepy
import config
initialize api instance\n
consumer_key= config.consumer_key
consumer_secret= config.consumer_secret
access_token=config.access_token
access_token_secret =config.access_token_secret
Connect to Twitter through the API
auth = tweepy.OAuthHandler(consumer_key, consumer_secret)
auth.set_access_token(access_token, access_token_secret)
api = tweepy.API(auth,wait_on_rate_limit=True)
Search Twitter for Tweets
def get_related_tweets(search_keyword):
    ''' collect tweets '''
    try:
        count = 50
        # Create Blank Dataframe\n",
        df_tweets = pd.DataFrame(pd.np.empty((0, 1)))
        for keyword in search_keyword:
            # Remove Retweets
            search_tag = keyword +  "-filter:retweets" +  "-filter:media"

            print('Searching tweets for: ', search_tag)

            fetched_tweets = tweepy.Cursor(api.search,
                                q=search_tag,
                                lang="en").items(50)
            # Add records to the dataframe
            df_tweets = df_tweets.append([[tweet.text] for tweet in fetched_tweets])
            # Add columns
            df_tweets.columns = ['tweets']
            #clean emojis and pictures from tweets
            df_tweets['tweets'] = df_tweets['tweets'].str.replace(r'[^\x00-\x7F]+', '', regex=True)
            # Retuen Data
            return(df_tweets)
    except Exception as e:
        print('Encountered Exception:', e)
        return None
Now, we have the front end of the application and an ML model ready. Finally, its time to connect the model and the webpage and for that, we need to import FLASK.
4. Connect the webpage with the Model using Flask
importing the required libraries
from flask import Flask, render_template, request, redirect, url_for
from joblib import load
from get_tweets import get_related_tweets
load the pipeline object
pipeline = load("text_classification.joblib")
function to get results for a particular text query
def requestResults(search_keyword):
# get the tweets text
tweets = get_related_tweets(search_keyword)
# get the prediction
tweets['prediction'] = pipeline.predict(tweets['tweets'])
# get the value counts of different labels predicted
data = str(tweets.prediction.value_counts()) + '\n\n'
return data + str(tweets)
start flask
app = Flask(name)
render default webpage
@app.route('/')
def home():
return render_template('home.html')
when the post method detect, then redirect to success function
@app.route('/', methods=['POST', 'GET'])
def get_data():
if request.method == 'POST':
user = request.form['search']
return redirect(url_for('success', name=user))
get the data for the requested query
@app.route('/success/')
def success(name):
return "
" + str(requestResults(name)) + "
"
I got different errors until my webpage opened and actually did a search. But finally, the above piece of code worked. I do not want to make this post lengthy with all the error details. But believe me, if you are getting any error, I am sure I have got that one. So let me know and I will see if I can be of any help.
Now, the final touch!
Run the Application
if __name__ == '__main__':
import random, threading, webbrowser
#port = 5000 + random.randint(0, 999)
#print(port)
#url = "http://127.0.0.1:{0}".format(port)
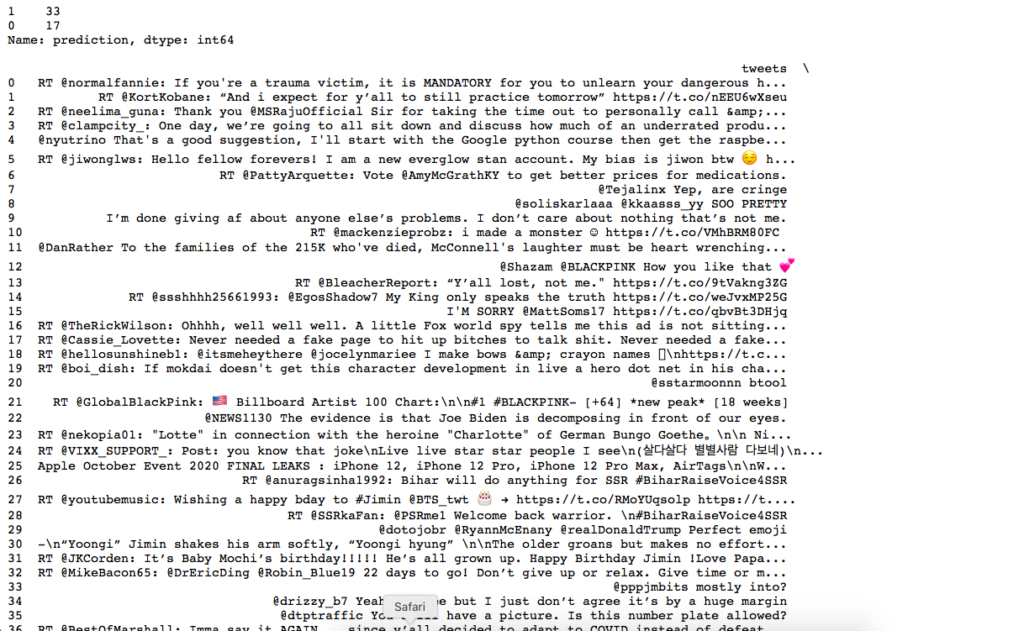
app.run(use_reloader=False, debug=True)And VOILA! My bright yellow webpage popped up in another window! So, now I have to search for a hashtag and see the results. I entered “#USElection2020” and the majority of the sentiments were predicted positive!
Conclusion:
So, that is how we can perform model deployment using Flask!
Honestly, I do not like the output format. It is not very useful, right? But as I said before, it is just a beginning. It needs a lot of work!
The code is available in my Github.
If you really like the article, clap once. If you dont, please let me know!
Thank you for reading!
9