Introduction:
Are you a Harry Potter fan? Well, it doesn’t matter. I will tell you what this post is all about. We will build an algorithm to make an Invisible Cloak like Harry Potter had, using Python OpenCV. Now, an Invisibility Cloak makes the wearer invisible! Cool right?
I read Harry Potter long back. I forgot a few important details like how Harry got that Cloak or when did he use it for the first time. So, I took a quick detour today to relive the magic. Now, I am feeling a strong urge to read it all over again.
Just an FYI, the Cloak belonged to Harry‘s father, James, but then came into Dumbledore’s possession after James died. Dumbledore is the one who anonymously gifted it to Harry during Christmas with a note that says:
“Your father left it in my possession before he died. It is time it was returned to you. Use it well.“
Ring a bell? Okay, let me add a small clipping.
Okay, now don’t get tempted! No more watching! it’s time to write some code and create a magic!
Invisibility Cloak using Python OpenCV
OpenCV (Open Source Computer Vision Library) includes several computer vision algorithms. I used OpenCV in one of my previous posts to detect eyes and smile on a picture. Also, used OpenCV to Detect Eyes and Smile on a Live Capture.
In this post, we will create this magical experience using an image processing technique called Color detection and segmentation.
Algorithm Steps:
1. Save the output Video on Mac (Optional)
I use Mac and I was trying to upload the video here. That’s why I wanted to save the OpenCV output as a movie file. This part is absolutely optional.
2. Capture, and store the background frame
Our main objective is to replace the red-colored cloak pixels with the background pixels to create an invisible effect in the video. So, to do that, we need to store the background image for each frame. We will dedicate a few seconds to capture and store the background. We will do this in 2 easy steps.
1. Give the camera some time to warm up
2. Capture the background in range of 60
3. Detect the red colored cloak using color detection and segmentation algorithm
In this step, we will focus on detecting the red part of the image. To do that, we will convert the RGB (red-blue-green) to HSV(hue-saturation-value).
Now, what does that even mean?
What is RGB?
RGB is an additive color model in which Red, Green, and Blue are added to create a whole range of colors.
The Decimal Code for RGB is as below:
Red: rgb(255,0,0)
Blue: rgb(0, 0, 255)
Yellow: rgb(255,255,0)
Green: rgb(0, 128, 0)

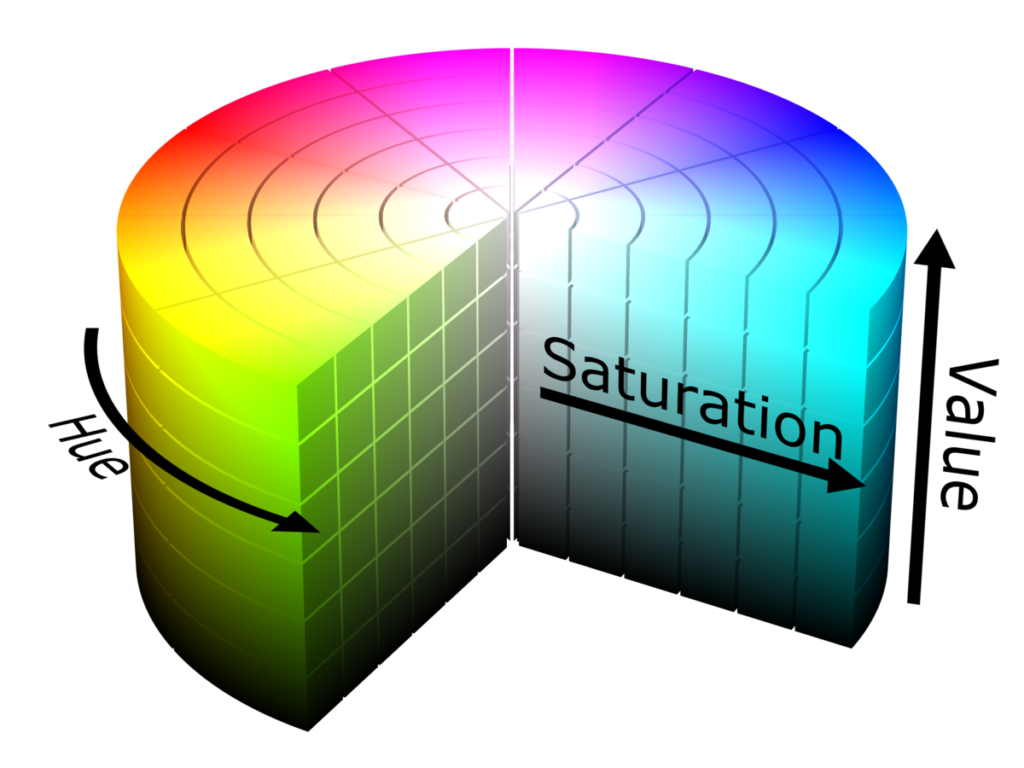
What is HSV?
HSV stands for Hue, Saturation, and Value.
Hue is the color portion of the model, expressed as a number from 0 to 360 degrees:
- Red falls between 0 and 60 degrees.
- Yellow falls between 61 and 120 degrees.
- Blue falls between 241–300 degrees.
Saturation encodes the intensity/purity of the color. Saturation appears as a range from 0–1, where 0 is grey, and 1 is a primary color. It can also be represented in percentage.
Value encodes the brightness or intensity of the color.
We will convert from RGB to HSV for better detection of the colors. After the conversion, it is time to specify the range of colors to detect red color in the video.
Sounds simple? Well, I was stuck at this point for some time. I was not sure what shade of red is my cloak. I tried a few ranges, but it was not working properly as it was masking either my face or the orange tee-shirt I was wearing! So after some digging, what I have learned is below:
- OpenCV by default reads images in BGR format.
- The Hue values are actually distributed over a circle (range between 0-360 degrees) but in OpenCV to fit into 8bit value the range is from 0-180. The red color is represented by 0-30 as well as 150-180 values.
- Human skin tone falls somewhere in the Red range and it is a genuine problem to differentiate the skin from cloth. Maybe a Green or Blue Cloak will work better!
4. Masking out the red colored cloak part
We need to generate a mask to determine the region in the frame corresponding to the detected color(red in this case). We refine this mask and then use it for segmenting out the cloth from the frame.
5. Generate the final augmented output
Now, the final touch of Magic! We will replace the pixel values of the detected red color region with corresponding pixel values of the static background. Voila! You are Invisible!
Python Code to Create Invisibility Cloak:
Conclusion:
After running the code, please wait for a few seconds to capture the background image. Then only, come in the frame with the red cloak to create a magical effect. Another challenge is to get an absolute red cloak. The one I am using here has some gold embroidery. So, that golden color peeks out sometimes. Also, my tee-shirt had some red flowers. Even that came into my way of being a great wizard. Jokes apart, it was fun!
If you like this post, please clap once! If you have any questions, let me know! The Jupyter Notebook is in my Github Repository. Feel free to take a look.
Thank You!
4