Introduction:
I have not yet worked with images and I had to give it a try. But where to begin? I started looking for Data. Of course, I checked Kaggle and downloaded some image data files. Then, I stared blankly at those images for some time with zero ideas about what to do. Finally, I decided to start with something simple and fun! So, this post is all about face and eye detection using Python OpenCV.
Applications:
I use a few mobile apps which work with images and do some amazing things.
Well, there is a couple of Plants Identifying apps that help to identify a plant and then recommend the care for those plants. I do love plants. But, I have a very bad reputation with them. I even killed a cactus. Now, don’t judge me, please!
I saw an app called “Planta: Keep your plants alive“. Yes, that tagline caught my attention. I am still fighting with the plants’ care, but that’s a story for another day. This app has a Plant identification feature which is very useful.
Another app that I use and that work with images is YouCam Makeup-Magic Selfie Cam. Yes, You guessed it right! It’s an app that will take a picture of lazy me and put some makeup to make it ready to upload in social media. During this lockdown, with my girl talking non-stop and asking me some weird questions continuously, who has time to dress up? This app is really fun! It will also do some live makeup which is using some cool machine learning tricks on images.
So, yes, this YouCam makeup app inspired me to do something similar today. In this post, I will start with a simple exercise. I will take an image of mine and detect the face and the eyes. Sound simple, right? Let’s make it simpler. I will divide this small project into smaller steps and analyzing each step.
Let’s get started with the exercise!
1. Install Libraries:
I will use the opencv-python package in this project. So first, let’s install that one. I specifically supplied the version since I was reading somewhere that the 4.x versions lack some functionalities. I need to check this!
pip install opencv-python
2. Select an Image
Now, we need a couple of images for this exercise. I didn’t want to spend some time on finding royalty-free images. That’s why, at first, I am using my own image in portrait mode to track my eyes. Cool?
Let’s do some coding!
3. Import Libraries
First, we will import all the required libraries.
import cv2
import numpy
from matplotlib import pyplot as plt
4. Read Image
Now, we will copy the image in the working directory and will read and display the image.
img = cv2.imread("IMG_2315.jpg")
plt.imshow(img)
plt.title('Thats Me!')
plt.show()

5. Convert to GrayScale
There is a method called cvtColor() in OpenCV that converts an image from one color space to another. So, let’s gray it out!
gray_img = cv2.cvtColor(img, cv2.COLOR_BGR2GRAY)
cv2.imwrite('outputs/gray_img_2315.jpg', gray_img)
plt.imshow(gray_img)
plt.title('Thats Gray Me!')
plt.show()

Detect the Face
Now, to detect face or eyes, we need classifiers. For example, the Face Classifier will classify a Face and Not-A-Face. For classifying face and eyes, we can use the Face Detection Classifier(Haar Cascades) that comes with OpenCV.
face_cascade = cv2.CascadeClassifier('haarcascade_frontalface_default.xml')
faces = face_cascade.detectMultiScale(gray_img, scaleFactor=1.3, minNeighbors=5, minSize=(30, 30),
flags=cv2.CASCADE_SCALE_IMAGE)
faces
Error:
I got an error like below after writing the above piece of code.

Actually, we need to put the file “haarcascade_frontalface_default.xml” in the working directory or you can pass the file path before the name. I searched for the file on my computer and copied and put it in the same folder. Or, you can simply download the file directly from the Github Repository. Once the file is copied to my working directory, the above issue is resolved.
“detectMultiScale” detects objects of different sizes in the input image. The detected objects are returned as a list of rectangles. Now, in this example, I am using only one face image and thus one rectangle should be returned.
Parameters for the method detectMultiScale:
| image | Matrix of the type CV_8U containing an image where objects are detected. |
| objects | Vector of rectangles where each rectangle contains the detected object, the rectangles may be partially outside the original image. |
| scaleFactor | Parameter specifying how much the image size is reduced at each image scale. |
| minNeighbors | Parameter specifying how many neighbors each candidate rectangle should have to retain it. |
| flags | Parameter with the same meaning for an old cascade as in the function cvHaarDetectObjects. It is not used for a new cascade. |
| minSize | Minimum possible object size. Objects smaller than that are ignored. |
| maxSize | Maximum possible object size. Objects larger than that are ignored. If maxSize == minSize model is evaluated on single scale. |
If faces are found, it returns the positions of detected faces as Rect(x,y,w,h) , an array object like below:
array([[ 98, 603, 881, 881]], dtype=int32)
Here, I have a confession to make. In all the examples that I was checking on cascades, it was passing the gray image to the argument “image”. But, I tried both! I passed the gray image object and the original colored image object and I got the same result. I am still confused about why everyone is insisting on passing the gray image.
Draw a Rectangle along the face
In this step, we will draw a rectangle along the face.
for (x,y,w,h) in faces:
    rect_img = cv2.rectangle(img,(x,y),(x+w,y+h),(0, 255, 0),2)
    roi_color = img[y:y+h, x:x+w]
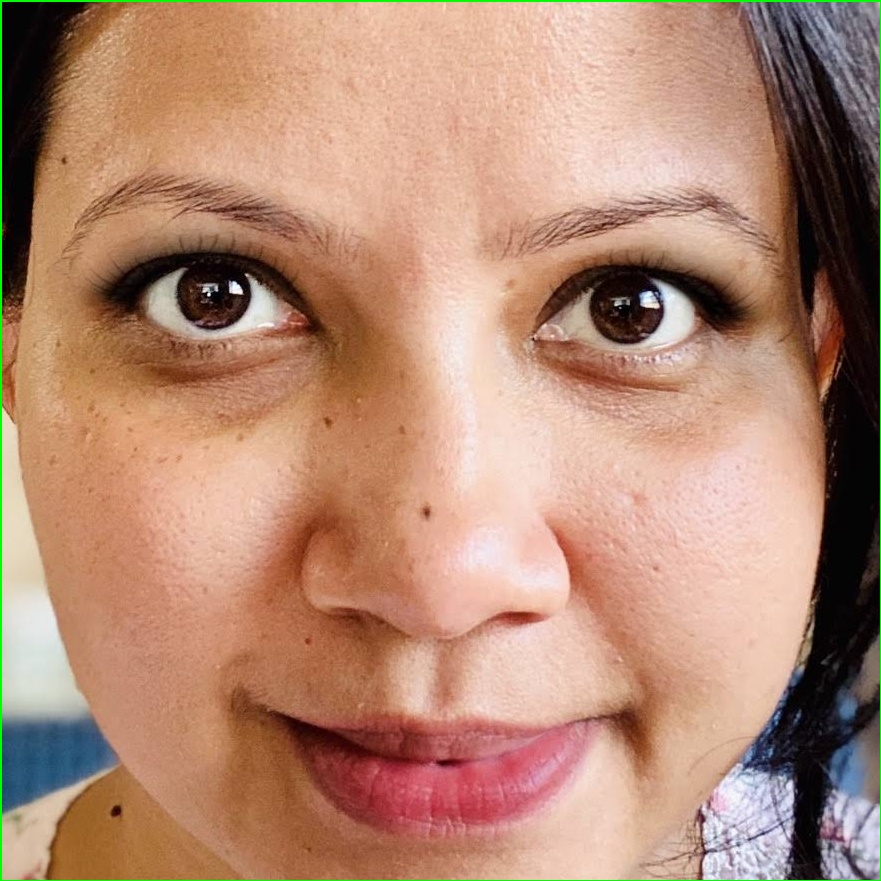
Here, we are drawing a rectangle along the face and then basically zoomed it to that measurement. That sounded a bit confusing, right? Now, let’s save the two images(rect_img and roi_color) and take a look.
cv2.imwrite('outputs/Mod_IMG_2315_1.jpg', rect_img)
cv2.imwrite('outputs/Mod_IMG_2315_2.jpg', roi_color)
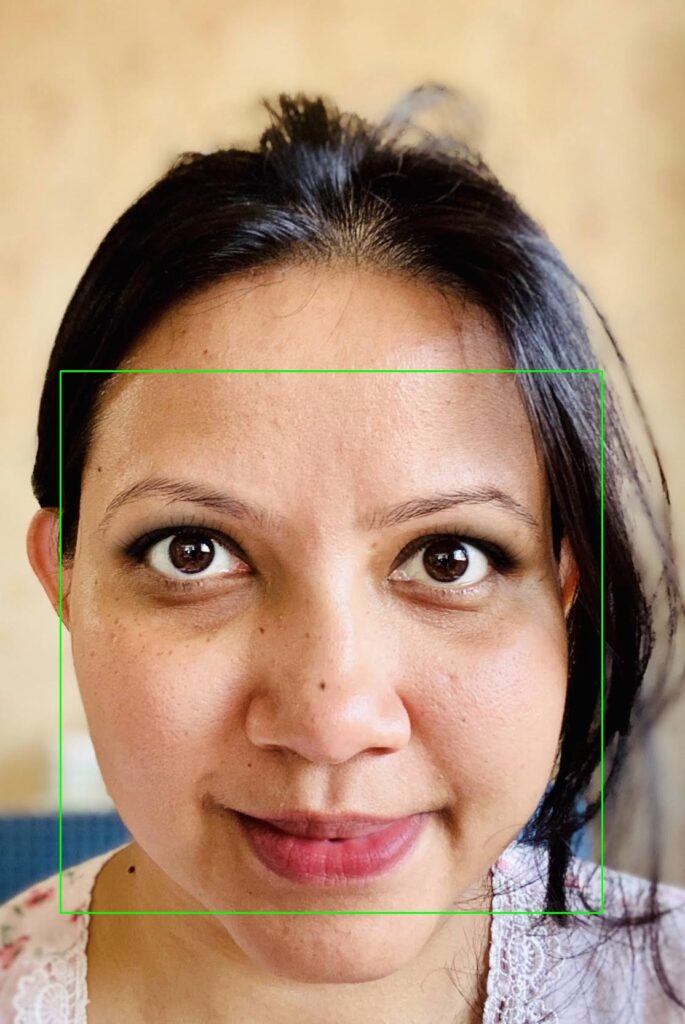
Now, does the above line makes any sense?
Detect the Eyes
In this example, we have a single face and it’s quite simple. We will use the Zoomed image to detect eyes. And this time, I copied the “haarcascade_eye.xml” file beforehand in my working directory. And in the end, I am writing the modified image on my computer.
eye_cascade = cv2.CascadeClassifier('haarcascade_eye.xml')
eyes = eye_cascade.detectMultiScale(roi_color)

#Loop
for (ex,ey,ew,eh) in eyes:
    mod_img = cv2.rectangle(roi_color,(ex,ey),(ex+ew,ey+eh),(0,255,0),2)

#Write the image
cv2.imwrite('outputs/Mod_IMG_2315_3.jpg', mod_img)
Finally, let’s take a look!
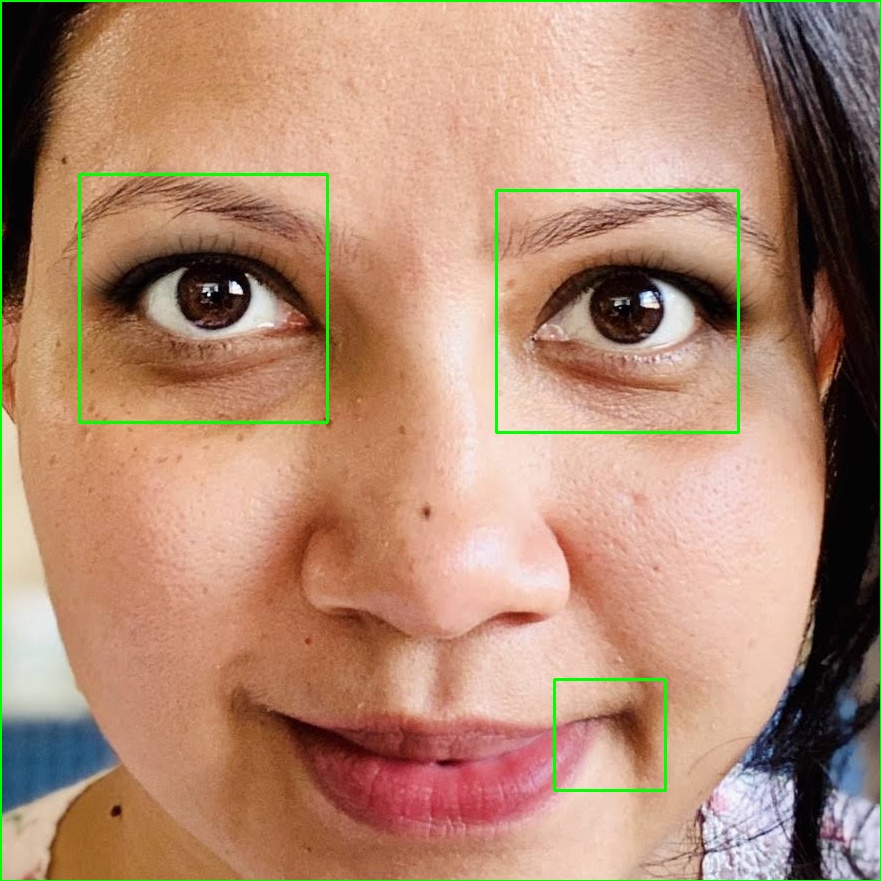
Hmm, it has detected a third eye! I always tell my daughter that I have a third eye. But I had never imagined that my dreams would come true like this!!! Jokes apart, there must be some fix for this problem!
Finally, I decided to write a function combining all the above code and thus pass different image file as an input and check what other issues do we get. So, here goes the function:
def detect_face_eyes(img, mod_name):
    import numpy as np
    import cv2

    face_cascade = cv2.CascadeClassifier('haarcascade_frontalface_default.xml')
    eye_cascade = cv2.CascadeClassifier('haarcascade_eye.xml')

    img = cv2.imread(img)
    gray = cv2.cvtColor(img, cv2.COLOR_BGR2GRAY)

    faces = face_cascade.detectMultiScale(gray, scaleFactor=1.3, minNeighbors=5, minSize=(30, 30), flags=cv2.CASCADE_SCALE_IMAGE)

    for (x,y,w,h) in faces:
        new_img=cv2.rectangle(img,(x,y),(x+w,y+h),(255,0,0),2)
        roi_gray = gray[y:y+h, x:x+w]
        roi_color = new_img[y:y+h, x:x+w]

        eyes = eye_cascade.detectMultiScale(roi_color)
        for (ex,ey,ew,eh) in eyes:
            final_img=cv2.rectangle(roi_color,(ex,ey),(ex+ew,ey+eh),(0,255,0),2)

    cv2.imwrite('outputs/'+mod_name, final_img)
Now since the function is ready, I would like to check the below scenarios:
- An image with One Face and with Glasses on
- Another image having multiple Faces
- And an image with no faces at all.
Oh No! it seems like the above function needs a lot of tuning. Faces and Eyes are detected everywhere!
So, let’s keep that part for my next post.
A Jupyter Notebook with all the code is available at my Github. Please take a look if any of the above piece of code is not working.
Also, I want to try the Face and Eye Detection on a Live Video. What about a smile detection? Well, so many things to explore!
Keep coding and continue having Fun!
Stay tuned for my next post. Thank You!
0